


"Floating unusually shaped items can cause them to shift while the machine is embroidering, which can throw your design off center. Therefore, you're much better off using specialty hoops."
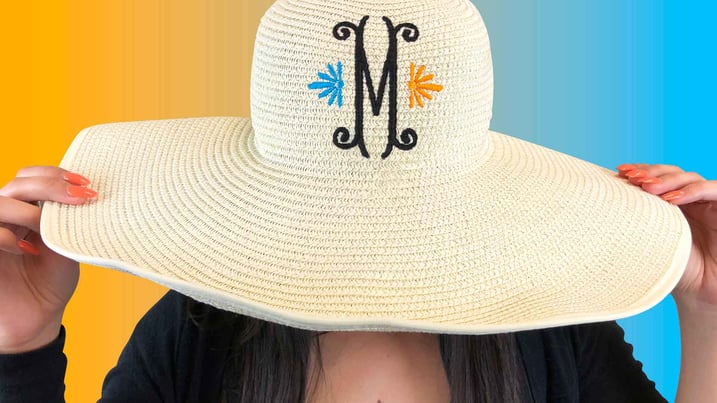
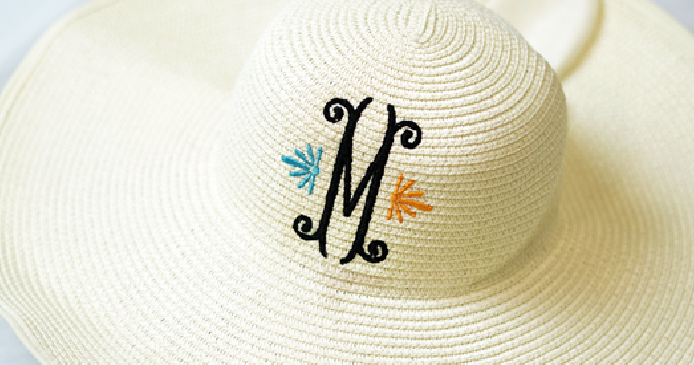
If you've ever tried embroidering a sun hat, you'll know the process is not as pretty as the end result...
Why?
Well, unless you have a specialty hoop, you'll need to place these straw hats over (rather than inside) the hoop. This technique, known as floating, essentially means you hoop the stabilizer alone and pin the item to the stabilizer to secure it into place. Click here to see how we embroidered cards using the floating technique.
However, floating unusually shaped items can cause them to shift while the machine is embroidering, which can throw your design off center. Therefore, you're much better off using specialty hoops such as an 8-in-1 Device or HoopTech clamps.
In this tutorial, you'll learn how we managed to embroider on the rounded surface of this straw sun hat using machine embroidery clamps. Watch the video below or continue reading to follow along with each step.
View more YouTube tutorials here.
What you'll need
- One or two tear away stabilizer sheets depending on the complexity of the embroidery design (One sheet of cut away stabilizer may also be used.)
- Water soluble stabilizer
- Blank sun hat
- Multineedle embroidery machine
- HoopTech machine embroidery clamps
- Embroidery thread clippers
- Water soluble fabric pen
- Fiskars fabric scissors
- Dense, stitch-filled embroidery design
- Embroidery fabric markers (optional)
- Temporary spray adhesive (optional)
Step 1: Prep your garment
Using a water soluble fabric pen, place a mark on your fabric according to the center point on the design. You can find the center of the design on the production worksheet.
Note: You can find and print the production worksheet when you open the design on your embroidery software. Click here to learn how to place and center your designs perfectly.
You may also apply temporary adhesive spray to the tear away backing to help prevent it from sliding as you place the material inside the hoop.
Step 2: Hoop it up!
Lift the lever on the clamp to release the pressure, and slide the stabilizer in between the clamps.
Next, place the sun hat in between the clamps until you've reached the area where you would like to embroider.
Smooth out the fabric, and pull the lever back down to tighten the clamps.
Note: Make sure the tear away backing continues to cover all areas of the hoop as you slide the hat inside.
Step 3: Attach the clamps to the machine
Attach the brackets on the clamps to the brackets on the pantograph rail of your machine.
To see the full process, click here to watch a tutorial on embroidering clutches using clamps.
Step 4: Trace, trace, trace!
Some machine panels include preset hoops that display your design relative to the hoop you're using. However, when you're using specialty hoops, chances are, you do not have the dimensions of the hoop programmed onto your panel. Therefore, you will need to center your garment manually.
To do so, align needle number 1 to the center mark you placed on your fabric. Then, perform a trace on your machine to confirm your placement is correct.
Note: Even if your machine has preset hoops, you should use them to supplement (not replace) manual centering.
Step 5: Press start...after this quick step
One last thing before you press start: Place a sheet of heavy water soluble stabilizer over the top of your design.
This will help prevent the stitches from getting lost in the textured straw material.
Note: It is not necessary to hoop the water soluble stabilizer with the material. You can simply "float" it over the top of your design. Once the machine begins to embroider, the stitches will hold it down on their own.
Step 6: Make the finishing touches
Tear away the water soluble stabilizer from the design. You may use a wet cloth to remove the excess bits remaining on the design.
If your design was not dense enough and there are some gaps in the design, you may also use an embroidery fabric marker (in the same color as your thread) to cover up any errors.
Step 7: Snap a photo, and share it on Facebook!
Now that you've created a beautiful embroidered sun hat, snap a photo and share it with your embroidery friends on a Facebook support group like Embroidery and Custom Apparel Mastery.


Ultimate Embroidery Cheat Sheet: 50 Popular Fabrics & How to Embroider Them for Best Quality
Did you know that you can improve the quality of your embroidery no matter which fabric you're embroidering on?
To guarantee your embroidery success, we've put together a cheat sheet of 50 of the most popular fabrics used for embroidery and the combination of materials that you'll need to give you the best possible results for your projects.
Click here to download your free copy
Quick tips
- Specialty hoops are your best bet for getting quick and professional embroidery on an unusually shaped item.
- For thick, stable materials like straw hats, you can use tear away backing.
- For textured materials like straw, always use designs with solid fills and place water soluble topping above your design before embroidering.
What's next?
- Visit our YouTube channel for more machine embroidery tips and embroidery ideas.
- Join our Facebook community, Embroidery and Custom Apparel Mastery, to share your work or learn from other embroiderers.