

"This makes for a fast and easy way to both personalize and sew finished items from scratch with your embroidery machine alone."
Did you know you can sew and embroider a stuffed animal from scratch using your embroidery machine?! Click here to see other machine embroidery projects you probably didn't know you could embroider.
This technique, called in the hoop embroidery, allows you to sew directly on your embroidery machine using a special digitized design.
This makes for a fast and easy way to both personalize and sew finished items from scratch with your embroidery machine alone.
In this tutorial, you'll learn how we managed to transform a few pieces of fabric into a full-blown stuffed animal using the in the hoop embroidery technique. Watch the video below or continue reading to follow along with each step.
View more YouTube tutorials here.
What you'll need
- In the hoop embroidery design
- Two large sheets of cut-away stabilizer
- Appliqué fabric (amount depends on design)
- Fiskars fabric scissors
- Tape
- Hand sewing thread
- Hand sewing needle
- Batting (stuffing)
- Appliqué scissors or sharp scissors
- White felt
Step 1: First hooping (Frankenstein's arms and legs)

You will need two separate designs to embroider this project.
In the first part, you'll embroider Frankenstein's arms and legs using the arms and legs embroidery design.
To do so, hoop a sheet of cut-away stabilizer, and place two sheets of fabric over the hoop.
Note: You do not need to hoop the stabilizer and fabric together. You can simply "float" the fabric over the hoop. Click here to see how we embroidered cards using the floating technique.
Step 2: Create the bolts, arms and legs
 Cut a T-shaped piece of felt to create the bolts on Frankenstein's head.
Set these aside for later.
Then, place the hoop in the machine, and embroider the arms and legs. Once they're done stitching, cut them out carefully along the stitches.
Note: Be sure to cut a few millimeters outside of the stitches, because you will need to turn the legs inside out to reveal the seam. (You'll see what we mean in the next step.)
Step 3: Turn the arms and legs inside out
 Now, you're going to take your arms and legs and turn them inside out to reveal a clean seam on the sides of the arms and legs.
Perform this step carefully, or you might end up tearing your stitches.
Note: You may gently use a screwdriver or tool to help you turn the arms and legs inside out.
Step 4: Stuff the arms and legs
 Next, cut a few pieces of batting and stuff your arms and legs!
Note: Make sure not to "over-stuff" them, or else it may be hard to get through the next steps.
Step 5: Second hooping (Frankenstein's body)
 Now it's time to hoop another sheet of cut-away stabilizer. Insert the hoop into the machine and place a sheet of batting over the stabilizer.
If you haven't done so already, select the second embroidery design for this project. In the next steps, most of the doll (including the arms and legs) will be sewn and embroidered.
Step 6: Mark your placement and place the corresponding fabric
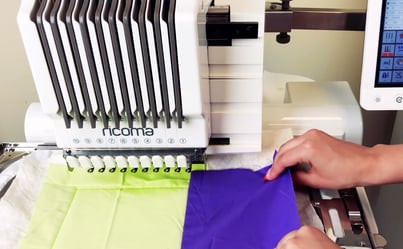
 It's time to begin embroidering the body and see your doll come to life. Press start to stitch a placement line that displays where to place your sheet of fabric.
In this case, the first placement line was Frankenstein's head. Therefore, we placed our green fabric over it to marry it to the stabilizer and batting.
Note: Follow the instructions on the color sheet to see which color stops correspond with the appliqué parts of the design.
Step 7: And again...
 In this design, the next color stop will mark the placement of Frankenstein's shirt.
Place the purple fabric directly above the placement line.
(The purple fabric should be placed above the green fabric, in this case).Then, resume the design.
After it has embroidered, fold the purple fabric over to reveal a clean edge on the top of Frankenstein's shirt.
Press start again to stitch over the loose end of Frankenstein's shirt and seal it shut.
Step 8: Appliqué time!
 Next up, we are going to create some traditional appliqué.
First, stitch the placement line for Frankenstein's hair. Then, place the fabric over the hair to sew it onto the rest of the design.
After your machine finishes stitching, cut around the edges of the fabric using appliqué scissors. Press start again to embroider the satin stitch, which will cover up the edges of the excess fabric.
The design will then continue to stitch the details on Frankenstein's face.
Step 9: And another appliqué
 Now, the machine will embroider the placement line for the collar. Place the fabric for the collar and repeat the appliqué process detailed in step nine.
Repeat the appliqué process for Frankenstein's bowtie and the bat on his shirt, as well. Click here to watch a full tutorial on appliqué.
Step 10: Where the magic happens
 Now, it's time to bring it all together. In the next steps, we are going to stitch the arms, legs and bolts onto the rest of the doll.
Press start to stitch the placement line for the bolts onto Frankenstein's head. Then, place the bolts facing toward each other. Use a piece of tape to hold the bolts down as the machine embroiders.
Step 11: Where the magic happens (part two)
 Place the arms on each side of Frankenstein's shirt (directly above the running stitch border of the doll).
Make sure to leave about half an inch of the arms outside of the running stitch border to allow the machine to stitch over the arms.
Next, place the legs facing up on the bottom half of Frankenstein.
Note: Use tape to hold down the arms and legs, so they don't interfere with the machine when it sews.
Step 12: Where the magic happens (part three)
 Place a piece of fabric over the entire design (including the arms and legs) to create the back of Frankenstein's body.
Then, press start and the machine will stitch over the fabric, creating a closure.
Note: You can tape or pin down the fabric to make sure it is secure.
Step 13: Unwrap your masterpiece!
 Remove the hoop from the machine and cut around the edges of the stitches carefully.
Then, use the opening on the side of Frankenstein to help you turn him inside out.
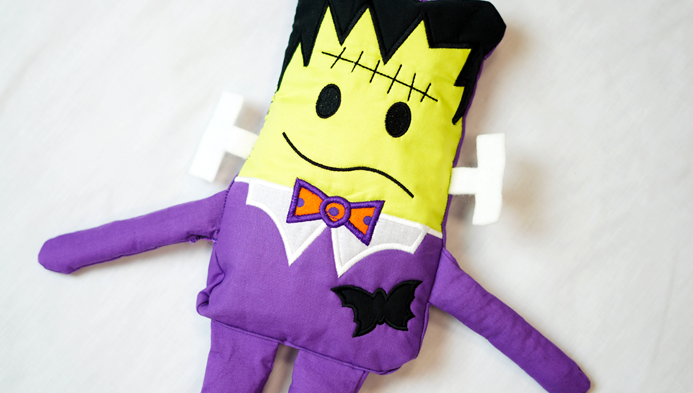
Step 14: Bring Frankie to life!
 Once you have finished turning the doll inside out, you'll see Frankie come to life. Use the opening on the side of his head to stuff him to your liking with batting.
Then, sew the opening. If you don't have a sewing machine, you can hand-sew it shut using an invisible stitch or a regular running stitch in the same color as Frankie's head.
Step 15: Celebrate with your friends!
Now that you've sewn a beautiful embroidered stuffed doll from scratch, snap a photo and share it with your embroidery friends on a Facebook support group like Embroidery and Custom Apparel Mastery.
And when you're done, check out "The Ultimate List of Embroidery Ideas: 101 Items to Embroider" for more machine embroidery ideas.


Ultimate Embroidery Cheat Sheet: 50 Popular Fabrics & How to Embroider Them for Best Quality
Did you know that you can improve the quality of your embroidery no matter which fabric you're embroidering on?
To guarantee your embroidery success, we've put together a cheat sheet of 50 of the most popular fabrics used for embroidery and the combination of materials that you'll need to give you the best possible results for your projects.
Download your free copy!Similar articles
- 9 Machine Embroidery Projects You Probably Didn't Know You Could Embroider
- Top 9 Creative Projects for Machine Embroiderers
- The Ultimate List of Embroidery Ideas: 101 Items to Embroider
What's next
- Visit our YouTube channel for more machine embroidery tips and embroidery ideas.
- Join our Facebook community, Embroidery and Custom Apparel Mastery, to share your work or learn from other embroiderers.